

On this tutorial, I’ll exhibit easy methods to cut back throttle sensitivity in Betaflight in addition to on radios working EdgeTX. The following pointers aren’t simply useful for learners; skilled pilots and racers also can profit when flying in tight areas that require exact throttle management at slower speeds. In case you’re struggling to handle altitude in your FPV drone—maybe your quad feels too highly effective, jumpy, or twitchy on throttle—this information is for you! This can be a frequent problem amongst learners flying in Acro mode, the place there’s no computerized altitude maintain. Thankfully, there are efficient methods to make your throttle simpler to handle with out negatively impacting general drone efficiency.

How Throttle Scale Helps New Pilots
Throttle scaling will be particularly helpful for FPV learners. A typical FPV drone has an especially excessive thrust-to-weight ratio, hovering round 20% to 30% throttle. Learners usually discover this difficult, as they’re nonetheless creating exact management, leading to problem sustaining steady altitude because of the tiny throttle stick vary they’re snug utilizing.
Advantages of lowering your drone’s throttle output:
- Reduces twitchiness and overcorrection.
- Supplies finer management and elevated decision on the throttle stick.
- Helps develop muscle reminiscence for clean throttle management.
Nonetheless, relying closely on throttle scaling may restrict your capability to develop as a pilot. Ideally, you need to embrace this problem by step by step rising your throttle restrict as your abilities enhance. Finally, mastering your drone at its full 100% throttle vary is the objective.
That stated, if extreme energy negatively impacts your enjoyment or creates frustration, throttle scaling could be a helpful instrument. In the end, prioritize your flying expertise and progress as a pilot, however don’t shrink back from incrementally difficult your self.
Skilled pilots and racers additionally profit from throttle scaling. By lowering most throttle, you may enhance precision in difficult environments, similar to technical race programs or tight flying areas the place most throttle isn’t wanted, however high-quality management is important. Throttle scaling maximizes stick decision exactly the place it issues—making it a flexible addition to your FPV toolkit.
Utilizing Throttle Scale in Betaflight
The best method to cut back drone energy and velocity is thru Betaflight’s throttle scale setting:
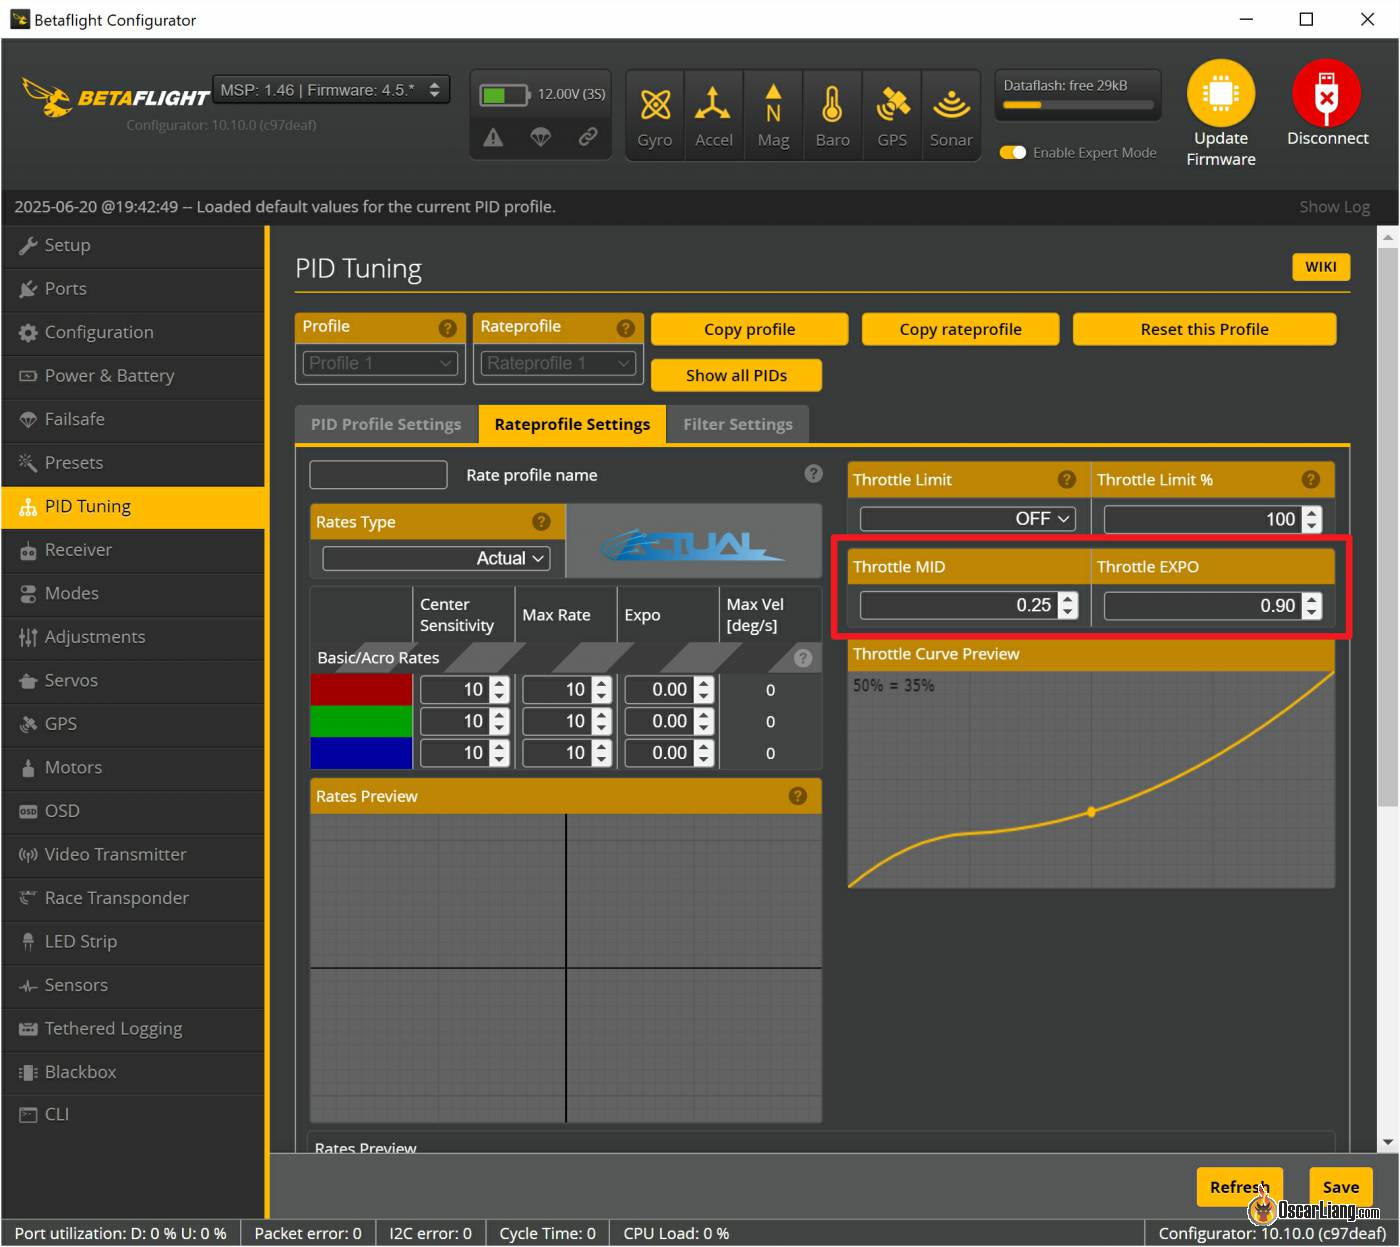
- Go to the “PID Tuning” tab.
- On the prime, swap to the “Rateprofile Settings” part.
- Discover “Throttle Restrict” and “Throttle Restrict %”.
- Within the dropdown, select “SCALE” – That is the setting you need. It scales your full throttle vary right down to a share.
- In Throttle Restrict (%), set it to one thing lower than 100%, like 80%. This implies full throttle in your stick will now solely command 80% motor output.
- Click on “Save”.

Betaflight affords another choice known as “CLIP”. Reasonably than scaling the whole throttle vary, CLIP cuts off throttle above sure share. For instance, setting CLIP to 80% means your throttle stick works usually as much as 80%, after which no further throttle is offered. The profit is the hover level stays the identical as earlier than, however the downside is you lose throttle stick decision, doubtlessly leading to much less exact management. CLIP will be helpful in sure functions, however for many FPV pilots, SCALE is often the advisable choice for lowering energy of your drone.
Totally different Throttle Scales per Charge Profile
Betaflight helps as much as 4 separate charge profiles, every with its personal throttle scale settings. You’ll be able to swap between these profiles through the Betaflight OSD menu or assign a swap in your radio (configured in Betaflight’s Adjustment tab).
Take into account setting totally different throttle scales for varied flying eventualities—indoor versus out of doors, freestyle versus racing, and so on.
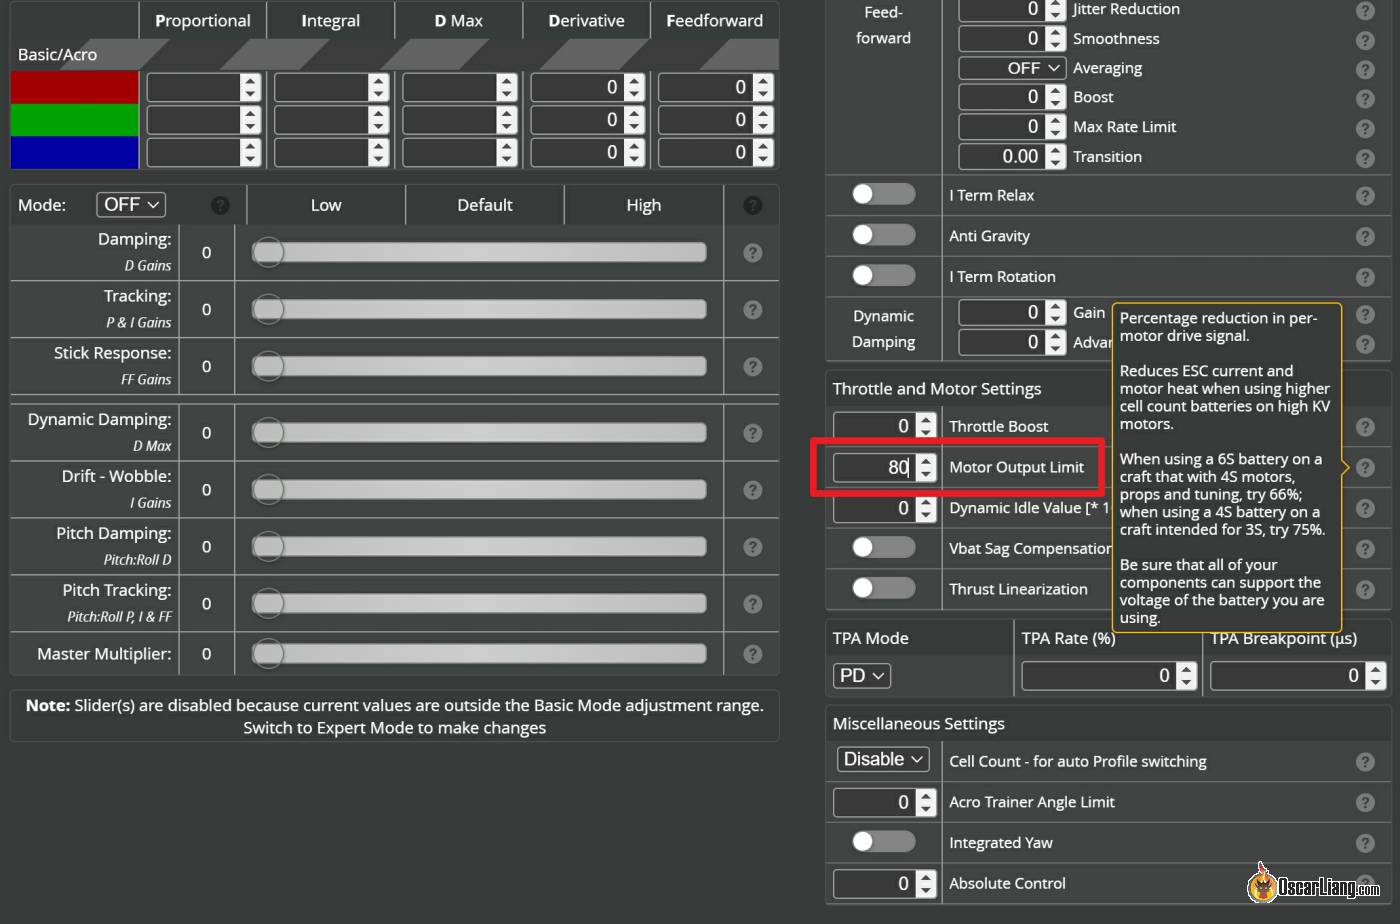
Motor Output Restrict (Not Advisable)
You might discover one other setting in Betaflight known as Motor Output Restrict beneath the PID Tuning tab.
I don’t suggest utilizing Motor Output Restrict to easily sluggish your drone down. This setting is meant primarily for limiting motor KV to scale back ESC present or utilizing higher-voltage batteries for high-KV motors.
Unnecessarily limiting Motor Output could make your drone sluggish as a result of motors received’t obtain full velocity when required, resulting in decreased responsiveness and even instability. For normal throttle administration, Throttle Scale stays the superior and safer selection.
Throttle Expo in Betaflight
Aside from throttle scaling, one other frequent methodology to handle throttle sensitivity is utilizing Throttle Expo in Betaflight. Throttle Expo flattens a portion of the throttle curve across the hover/cruising level, offering finer management decision in that space, whereas nonetheless preserving 100% throttle vary.
Though this methodology will be useful in sure conditions, I personally don’t suggest it for learners. Throttle Expo could make throttle response much less predictable, because the hover level could shift relying on battery voltage, propeller effectivity, and payload weight and so on. As a substitute, I strongly suggest utilizing Throttle Scale, as mentioned earlier, for extra predictable and constant throttle response.
Throttle Scaling on EdgeTX Radios
In case you’re unable or want to not use Betaflight for throttle scaling, you are able to do the same factor in your EdgeTX radio. This methodology is easy and is very helpful in case you fly a number of drones, as it could actually apply universally throughout fashions.
Go to Mixer in your radio. Discover the Throttle channel, maintain down the Enter button, and choose Edit.

The default Weight worth is 100 (representing 100% throttle). Scale back this to your required throttle share (e.g., 80 for 80% throttle).
Throttle channel worth begins from -100 to 100 (0% to 100%), so you must regulate the Offset worth to make sure the throttle vary begins appropriately at -100. For instance, in case you set Weight to 80 (20% lower than default), your Offset ought to be set to -20.

That’s it! Your drone will now have a scaled throttle output.
You’ll be able to even configure a knob or slider in your radio to dynamically regulate throttle scaling throughout flight. This may be notably helpful for pilots often flying each indoors and outdoor or racers who want various throttle limits for various tracks.
Superior Setup: Dynamic Throttle Scaling with Potentiometer
Wish to dynamically change throttle scaling on-the-fly utilizing a knob in your EdgeTX radio? Listed here are two highly effective methods to perform this: Mixer Multiplex and International Variables.
Technique 1: Mixer Multiplex
On this instance, I’ll use a knob (potentiometer) to range throttle scaling from 50% to 100%.

Within the Mixer menu, discover the throttle channel.
Insert a brand new line beneath your current throttle channel by holding down Enter and deciding on Insert After.

Edit this line, select a knob or slider because the supply, I’ll use S2 on this instance. Set Weight to 25, Offset to 75.

Scroll down in the identical web page and set Multiplex to “Multiply”.

Now add one other line beneath the one we simply created. Once more, choose the identical knob/slider because the supply (S2 in our instance), and set Weight to 25 and Offset to -25.

However this time you need to choose “Add” within the Multiplex setting.

And you need to find yourself with this:

This ought to be working now!
Lastly you may setup a swap to allow/disable this function. Merely add a swap place in these two traces, so the max throttle stays at 100% and unaffected by the knob when the swap just isn’t energetic. Do that for each *= and += traces.

To set totally different most throttle vary, like 0% to 100% as an alternative of fifty% to 100%, you solely must mess around with the Weight and Offset of the 2 traces beneath throttle. Listed here are two examples, 50% to 100% and 0% to 100%.
50% to 100% Max Throttle
- *= S2 Weight 25, Offset 75
- += S2 Weigh 25, Offset -25
0% to 100% Max Throttle
- *= S2 Weight 50, Offset 50
- += S2 Weight 50, Offset -50
Technique 2: International Variables
This strategy is extra complicated however demonstrates the flexibility and energy of EdgeTX’s International Variables (GV) function. It achieves the identical consequence because the Mixer Multiplex methodology however may encourage different inventive setups.
Go to Inputs.

Create two new inputs. Use the identical slider or knob of your selection because the Supply. We’ll use S2 in our instance.
We’ll use the values of those inputs because the Weight and Offset of the our throttle, due to this fact I title these inputs TWgt (Throttle Weight) and TOfs (Throttle Offset) respectively.
It would sound a bit complicated now, no worries, simply hold following what I’m doing right here, it doesn’t matter what you name them so long as you recognize which is which.
And set the Weight and Offsets values in response to the diagrams beneath. These values will permit the throttle cap to alter from 50% to 100% as we flip the slider from 0% to 100%.


It’s best to find yourself with 2 new inputs like this.

Now go to the Particular Perform web page.

Create two “ON” capabilities to regulate GV1 and GV2 base on the inputs we beforehand created. What these principally do is to show the slider worth into “world variables” so we will entry it in this system freely;
TWgt = GV1, and TOfs = GV2.
Don’t neglect to allow these capabilities by checking the bins on the proper.

Right here is the ultimate step. Go to the Mixer web page, and edit the Throttle channel.
Use GV1 because the Weight of the Throttle channel, and GV2 because the Offset. You’ll be able to really do that within the Inputs Web page too, both manner is ok.

That’s it! It ought to be working now.
If you want, you may assign a swap to allow/disable this function. Go to Particular Features.
Assign two capabilities to a spare swap you need to allow/disable this function, and use “Regulate GV1 100”, and “Regulate GV2 0”. That is principally setting the throttle channel weight and offset within the mixer again to the default values.

To make use of totally different max throttle vary, merely mess around with Weight and Offsets within the two slider inputs. Listed here are some examples:
50% to 100% Max Throttle
- TWgt (Weight 25, Offset 75)
- TOfs (Weight 25, Offset -25)
0% to 100% Max Throttle
- TWgt (Weight 50, Offset 50)
- TOfs (Weight 50, Offset -50)
Remaining Throughs
Throttle scaling can considerably enhance your management over FPV drones, benefiting learners and skilled pilots alike. Whereas scaling through Betaflight is easy, EdgeTX radios supply versatile, dynamic strategies to go well with totally different flying eventualities. Experiment with these settings to search out your superb steadiness of responsiveness and management, enhancing your FPV flying expertise.
